The desire for a fuller, more defined pout has led to a boom in lip-enhancing techniques, but few are as accessible and transformative as overlining. This isn’t about creating an unnatural look; it’s an art of subtle illusion, using makeup to softly reshape and amplify your natural lip line. When done correctly, overlining can give you a plump, defined look that’s perfect for both everyday wear and a night out. Done incorrectly, and you might look like a cartoon character. But don’t worry, we’re here to guide you through the process, from selecting the right tools to mastering the technique for a flawless finish that looks entirely your own.
The Essential Overlining Toolkit
The foundation of a perfect overline is the right product. You wouldn’t build a house with a flimsy hammer; the same applies to your lip look. Your toolkit should prioritize precision and a smooth application.
-
– Choosing the Right Lip Liner: The key is to select a creamy yet firm pencil that glides on without tugging at your skin. Avoid waxy or dry formulas that can skip and create an uneven line. The finish matters, too: matte liners are best for a defined, long-lasting look, while a satin finish can blend more seamlessly with a hydrating lipstick.
-
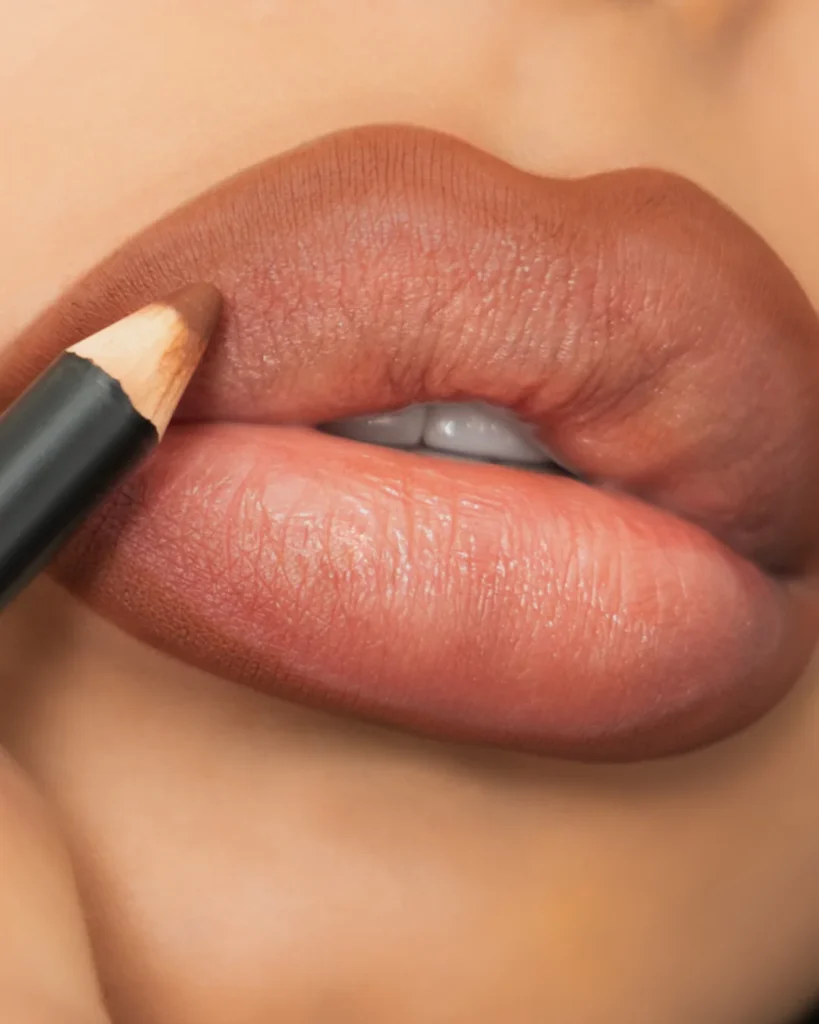
– The Importance of a Sharp Pencil: A dull pencil is your worst enemy in the quest for a subtle overline. A sharp point allows for precise lines, especially around the cupid’s bow and corners of the mouth, preventing a messy or overdone look. Always sharpen your pencil before use.
-
– Finding Your Perfect Nude or Match: For the most natural-looking overline, your liner should be a near-perfect match to your lip color or just one shade darker. Using a nude shade that complements your skin’s undertone is a foolproof way to create the illusion of fullness without a harsh, visible line.
-
A Step-by-Step Guide to Overlining for a Natural Look
This is the core of the technique. Follow these steps for a safe, subtle, and stunning result every time.
-
Step 1: Prep Your Lips. Start with a clean, smooth canvas. Exfoliate your lips gently to remove any flakes, then apply a hydrating lip balm and let it sink in. Blot off any excess before you begin.
-
Step 2: Define Your Base. Start by drawing a small ‘X’ at your cupid’s bow to create a clean, crisp peak. Next, line the centre of your bottom lip along your natural lip line. This creates a solid base and anchor points for the rest of your work.
-
Step 3: The Overlining Technique. This is where the magic happens. Instead of tracing your natural lip line, you’ll draw just slightly outside it. For the top lip, start at the outer corner and draw toward the centre, connecting to the ‘X’ at the cupid’s bow. For the bottom lip, start at the outer corner and draw toward the centre, connecting to the line you drew in Step 2.
-
Step 4: Blend and Fill. Once you’ve created your new, larger shape, use the side of the liner to lightly shade in the outer corners of your lips, blending inward. This creates a soft gradient and helps the look last longer.
-
Step 5: The Finishing Touch. Now, fill in the rest of your lips with lipstick or lip gloss. For a subtle, naturally fuller look, use a shade that is close to the color of your liner. For a more dramatic look, you can use a slightly lighter shade in the centre of your lips to create a pouty ombre effect.
-
Step 6: Setting for All-Day Wear. To lock in your look, you can gently blot your lips with a tissue or set the liner and lipstick with a translucent powder.
-

Overlining for Different Lip Shapes
The same technique doesn’t work for every lip shape. Tailor your application for a bespoke, natural-looking result.
-
– Overlining Thin Lips: Focus your overlining on the center of the cupid’s bow and the center of the bottom lip. This creates a rounded, fuller shape without extending too far into the corners, which can look unnatural.
-
– Overlining Asymmetrical Lips: If one side is thinner than the other, simply overline the thinner side to match the fuller side. This is a simple, effective way to create symmetry and balance.
Common Overlining Mistakes and How to Fix Them
Even the pros make mistakes. Being able to spot and fix them is key to a flawless finish.
-
– The “Clown” Look: This happens when your liner is too dark or you’ve overlined too far from your natural lip line. The Fix: Start over! Or, if the line isn’t too severe, use a clean Q-tip and concealer to carefully trace and clean up the edges.
-
– The Mismatch: Using a liner that’s too light or too dark for your lipstick can create a harsh, unflattering line. The Fix: Always test your liner and lipstick together on the back of your hand before applying.
-
– The Smudge: Your liner bleeds or feathers outside the line, often from skipping the prep step or using a too-creamy formula. The Fix: Make sure your lips are clean and dry before applying. If the issue persists, try a long-wear or waterproof liner.
Overlining vs. Lip Fillers: What’s the Difference?
Overlining is a temporary, non-invasive cosmetic technique that creates the illusion of fuller lips using makeup. Lip fillers, by contrast, are medical procedures involving injectables (usually hyaluronic acid) to physically increase the volume of the lips.
-
– Safety: Overlining is entirely safe, with no medical risks involved. Lip fillers, as a medical procedure, carry potential risks and side effects.
-
– Longevity: Overlining lasts as long as your makeup does, typically a few hours. Lip fillers last for several months to a year before requiring touch-ups.
-
– Cost: Overlining requires only the cost of a lip liner, a few dollars at the drugstore. Lip fillers are a significant financial investment, often costing hundreds or thousands of dollars per session.
Products to Master the Look
You don’t need to break the bank to achieve a stunning look. Our top picks are available at major Canadian retailers.
-
– Top Canadian Drugstore Picks: Look for affordable, reliable options like the NYX Slim Lip Pencil or the Maybelline Color Sensational Shaping Lip Liner. They offer a wide range of shades and are widely available at retailers like Shoppers Drug Mart and Amazon.ca.
-
– High-End Liners Worth the Splurge: For a truly luxurious feel and unparalleled longevity, consider brands like MAC and Charlotte Tilbury. Their formulas are often more pigmented and long-lasting, available at Sephora Canada.
-
-
